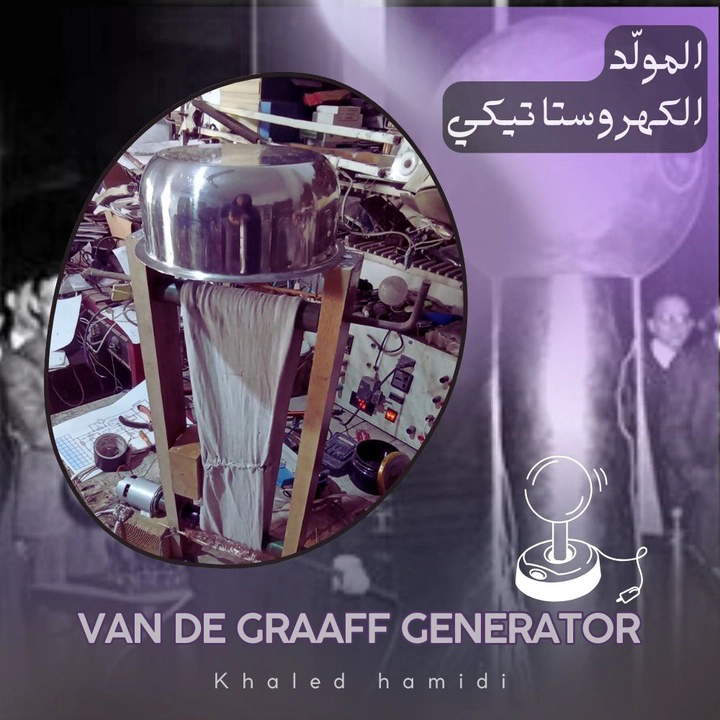
Building a Van de Graaff Generator: A DIY Guide
Introduction: The Spark of Static Electricity
Have you ever felt a light, sudden electric shock when touching a metal doorknob, or seen your hair stand on end when taking off a wool sweater on a dry day? That small spark is a miniature version of a tremendous force latent in nature: static electricity. What if we could tame this force and generate it before our eyes in the lab? This is where the Van de Graaff generator comes in, the device that transforms this simple, everyday phenomenon into a stunning and safe scientific spectacle.
How Does the Generator Work?
The Van de Graaff generator relies on transferring electric charges from a lower point to the upper metal dome using a belt made of an insulating material.
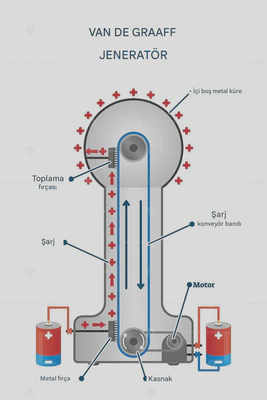
The Principle:
- The lower voltage source charges the lower combs.
- The lower comb transfers the charge to the surface of the insulating belt.
- The moving belt carries the charges upward.
- The upper comb draws the charge from the belt.
- The metal dome accumulates the charges until it reaches a very high voltage.
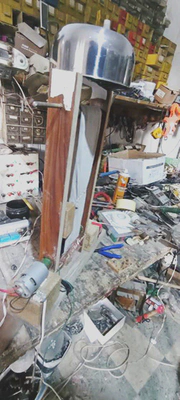
Building the Generator: Step-by-Step
This model was built using materials available in the laboratory at the lowest possible cost.
1. Building the Wooden Frame
A simple wooden frame was prepared to mount the motor, pulleys, and belt.
 |  |
|---|
The motor used here is a Johnson 70312 DC motor, a powerful motor typically used in power tools that operates efficiently at 12 volts. It has good torque, sufficient to rotate the belt pulley at a constant speed.
After that, the upper and lower pulleys were installed in a parallel and secure manner.
 |  |
|---|
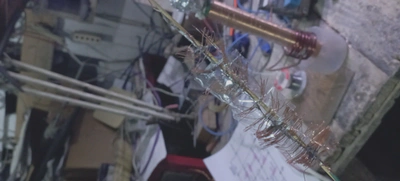
2. Preparing the Copper Combs
The combs are the most sensitive part of the Van de Graaff generator. Their function is to transfer charges to and from the belt.
To prepare them, fine copper strands were extracted from a multi-strand electrical wire, then fixed on a wooden rod to form a charging and a collecting comb.
 |  |
|---|---|
 |  |
The comb must be close to the belt, at a distance of 1–3 mm, without touching it, as the precise distance is what determines the success of the charging process via Corona Discharge.
3. Final Assembly
After preparing the frame, pulleys, combs, and motor, they were fully integrated and the motor was connected to a 12-volt source.
Results and Lessons Learned
After connecting the generator to power, the belt rotated well, but the device was unable to generate static electricity.
Why Didn’t It Work? Potential Technical Reasons
1. Belt and Pulley Materials
The charging effect depends on the Triboelectric Series. If the belt material is unsuitable, no effective charge transfer will occur.
2. Comb Design
If the strands are too far or too close, the charge transfer stops. Also, any loose connection will lead to a complete leakage of the charge.
3. High Humidity
Humidity is a direct enemy of static electricity. Humid air leaks the charge before it accumulates.
4. Charge Leakage from the Frame
The presence of sharp corners or exposed screws near the dome leads to immediate charge leakage through partial discharge.
5. Lack of an Ideal Metal Dome
The dome must be:
- Very smooth
- Without edges
- Without holes
- And made of a thin, well-conducting metal
Conclusion of the Experiment
Although the device did not succeed in generating a charge, the experiment provided:
- A practical understanding of the mechanism of static electricity generators
- Experience in designing combs and pulleys
- Knowledge of the actual problems facing educational electrical devices
- The possibility of developing the model in the next version by improving the materials and structure
These experiments are the real basis for actual engineering learning.
Let me know if it works for you.
